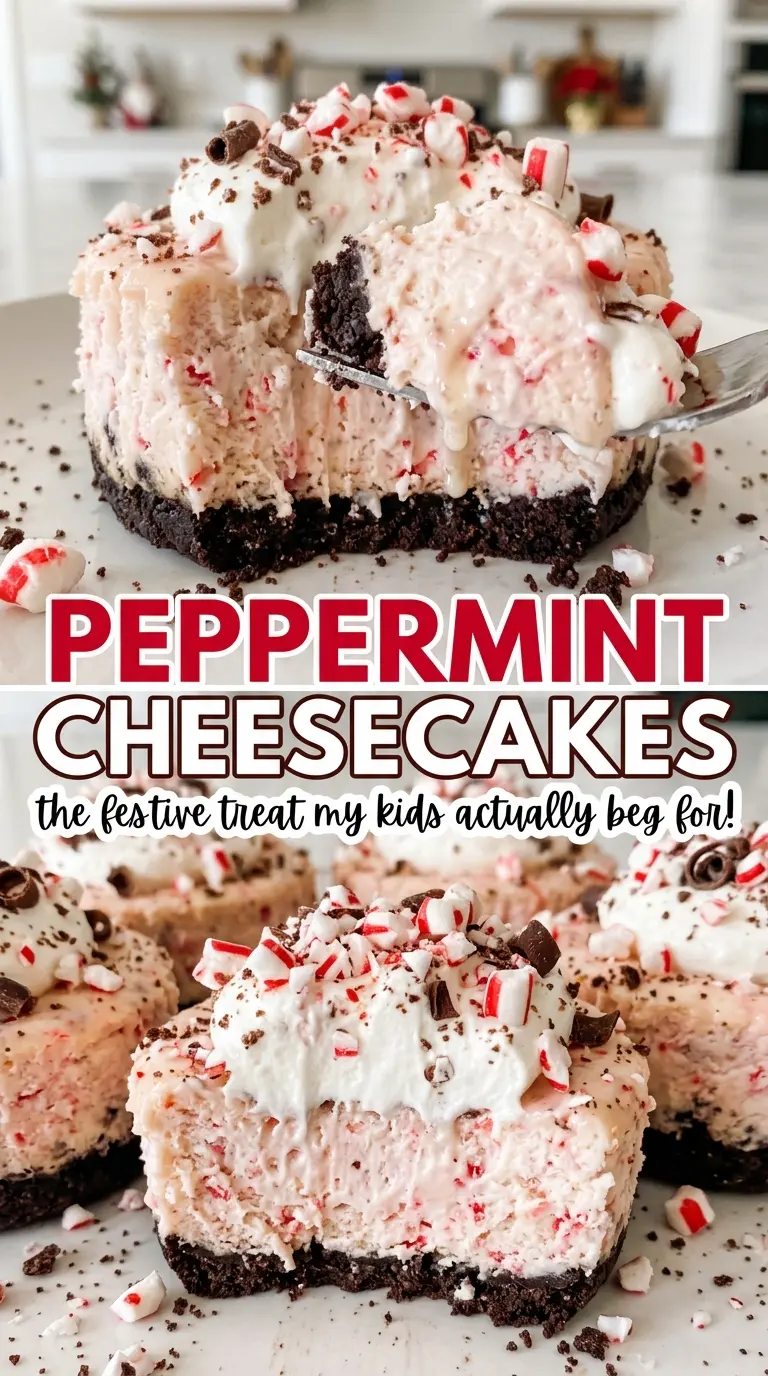
The centers should still have a soft wobble when the muffin pan comes out of the oven. Waiting for them to look completely firm is an easy way to overbake these little cheesecakes. Peppermint cheesecakes have a chocolate sandwich-cookie crust, a smooth minty filling, and a cool swirl of whipped cream on top.
Baking them in a muffin pan gives you neat individual portions without a water bath or the worry of slicing a full cheesecake. I keep the peppermint extract measured rather than pouring it by feel; its cool, sharp flavor can take over quickly. The result is a creamy bite with enough chocolate and peppermint to taste balanced.

Kitchen Note
Add the crushed peppermint candies just before serving. They stay crisp on the whipped cream instead of softening while the cheesecakes sit.
Save these peppermint cheesecakes for a make-ahead dessert with chocolate cookie crusts, cool mint filling, and a crisp candy finish.
Why I Beat the Eggs Last, and Only on Low
Cheesecake filling needs air incorporated at the beginning to turn the cream cheese and sugar smooth, but extra air from the eggs can make the finished centers puff up in the oven and then sink as they cool. That’s why I get the cream cheese mixture smooth first, then switch to low speed before adding the eggs. Mixing each egg only until it disappears keeps the filling dense and creamy instead of foamy.
Scrape the bowl as you work, especially where the bottom meets the sides. A streak of cream cheese left there can turn into a small lump in the filling, even when the top of the mixture looks smooth. Once the sour cream and extracts go in, stop mixing as soon as they’re evenly blended; the batter doesn’t need extra beating.
This gentle mixing also helps the little cakes bake evenly in their paper liners. They’re small, so you don’t need to whip the filling into a fluffy batter or keep beating to make it look lighter.
Why the Cookie Crème and Sour Cream Matter Here
- Chocolate sandwich cookies — Their chocolate wafers bring a darker, slightly bitter note that keeps the sweet filling from tasting one-dimensional. The crème filling helps the crumb mixture hold together, so use finely crushed cookies rather than coarse pieces. For a gluten-free version, use gluten-free chocolate sandwich cookies; see the variation below.
- Unsalted butter — Melted butter binds the crumbs into a base that holds its shape when you peel away the liner. Unsalted butter keeps the crust from picking up extra salt, but the main thing is to stir it through the crumbs thoroughly so there aren’t dry patches.
- Cream cheese — This is the structure and richness of the filling, so use softened block cream cheese rather than whipped cream cheese from a tub. Cold cream cheese is harder to beat smooth and can leave small lumps. Let it soften before mixing.
- Granulated sugar — Granulated sugar sweetens the filling while it beats into the cream cheese. Keep it rather than swapping in a liquid sweetener, which would change the filling’s moisture and set.
- Eggs — Eggs give the filling its baked, sliceable set. Room-temperature eggs blend more readily into the cream cheese mixture; cold eggs can make the batter feel less uniform.
- Sour cream — Sour cream softens the rich cream-cheese texture and adds a gentle tang. Full-fat plain Greek yogurt is the most practical substitute in the same amount, though the filling will taste a little tangier and may be slightly less silky.
- Vanilla and peppermint extracts — Vanilla rounds out the chocolate and dairy flavors, while peppermint extract gives the filling its cool finish. Use peppermint extract, not peppermint oil; oil is much more concentrated and isn’t a direct swap.
- Heavy cream and powdered sugar — Cold heavy cream whips into a topping sturdy enough to spoon or pipe, and powdered sugar sweetens it without a gritty feel. Heavy whipping cream works in place of heavy cream; milk won’t whip into the same topping.
- Peppermint candies — Crushed peppermint candies give the soft topping a bright mint flavor and a crisp contrast. Crushed candy canes work in their place, especially if you want the topping to look extra festive.
From Pressed Cookie Crust to Chilled, Creamy Centers
Pressing a Firm, Even Crust
Heat the oven to 325°F and line a standard 12-cup muffin pan with paper liners. Stir the finely crushed cookies with the melted butter until the crumbs are evenly moistened. Divide them among the liners, about 2 tablespoons per cup, then press firmly into an even layer so the crust doesn’t crumble when you serve each cheesecake. Bake the crusts for 5 minutes and take the pan out of the oven.
Mixing the Filling Without Whipping in Air
Beat the softened cream cheese and granulated sugar in a large bowl on medium speed until smooth, scraping down the bowl as needed. Add the room-temperature eggs one at a time on low speed, stopping as soon as each is combined. Mix in the room-temperature sour cream, vanilla, and peppermint extracts just until evenly blended. If you still see cream cheese streaks, scrape the bowl and mix briefly rather than increasing the speed.
Baking Until the Centers Just Set
Divide the filling evenly among the cookie crusts. Bake for 20 to 25 minutes; the centers should be just set with a slight wobble, and an instant-read thermometer should read 160°F. Don’t wait for the tops to look firm all the way through, because the centers continue to settle as the cheesecakes cool. Cool them in the pan for 30 minutes, then refrigerate for at least 4 hours until thoroughly chilled.
Whipping and Finishing the Topping
Use cold heavy cream and a chilled bowl so the cream whips up evenly. Beat it with the powdered sugar until medium-stiff peaks form; the peaks should hold their shape when you lift the beaters. Spoon or pipe the whipped cream onto the chilled cheesecakes, then finish each one with crushed peppermint candies before serving.
Two Easy Ways to Adapt These Peppermint Cheesecakes
Make the crust gluten-free
Replace the chocolate sandwich cookies with gluten-free chocolate sandwich cookies and crush them finely before mixing with the melted butter. The filling and topping stay the same, and the crust keeps its chocolate-cookie character.
Trade the candy crunch for dark chocolate
Use finely shaved dark chocolate on top in place of the crushed peppermint candies. You’ll keep the chocolate-and-mint pairing from the filling, but lose the crisp, candy-cane bite.
Make-Ahead, Storage, and Serving
- Refrigerator: Keep the cheesecakes covered and untopped for 3 to 4 days. The crust gradually softens, but the chilled filling stays creamy.
- Freezer: Freeze the chilled, untopped cheesecakes individually wrapped, then thaw them overnight in the refrigerator. Add the whipped cream and candy after thawing.
- Serving: Serve them cold; these are meant to be eaten chilled, not reheated. Top with whipped cream and peppermint candies shortly before they go to the table.
Questions That Come Up When Baking Mini Peppermint Cheesecakes
Peppermint Cheesecakes
Ingredients
Equipment
Method
- Heat the oven to 325°F.
- Line a standard 12-cup muffin pan with paper liners.
- Stir the finely crushed chocolate sandwich cookies and melted unsalted butter together.
- Divide the mixture among the liners, about 2 tablespoons per cup.
- Press the mixture firmly into an even layer.
- Bake for 5 minutes, then remove the pan from the oven.
- Beat the softened cream cheese and granulated sugar in a large bowl with an electric mixer on medium speed until smooth, scraping down the bowl as needed.
- Beat in the eggs one at a time on low speed just until combined.
- Mix in the sour cream, vanilla extract, and peppermint extract.
- Divide the filling evenly among the crusts.
- Bake for 20 to 25 minutes, until the centers are just set with a slight wobble and reach 160°F on an instant-read thermometer.
- Cool the cheesecakes in the pan for 30 minutes.
- Refrigerate for at least 4 hours until thoroughly chilled.
- Beat the cold heavy cream and powdered sugar in a chilled bowl until medium-stiff peaks form.
- Spoon or pipe the whipped cream onto the chilled cheesecakes.
- Sprinkle with crushed peppermint candies just before serving.