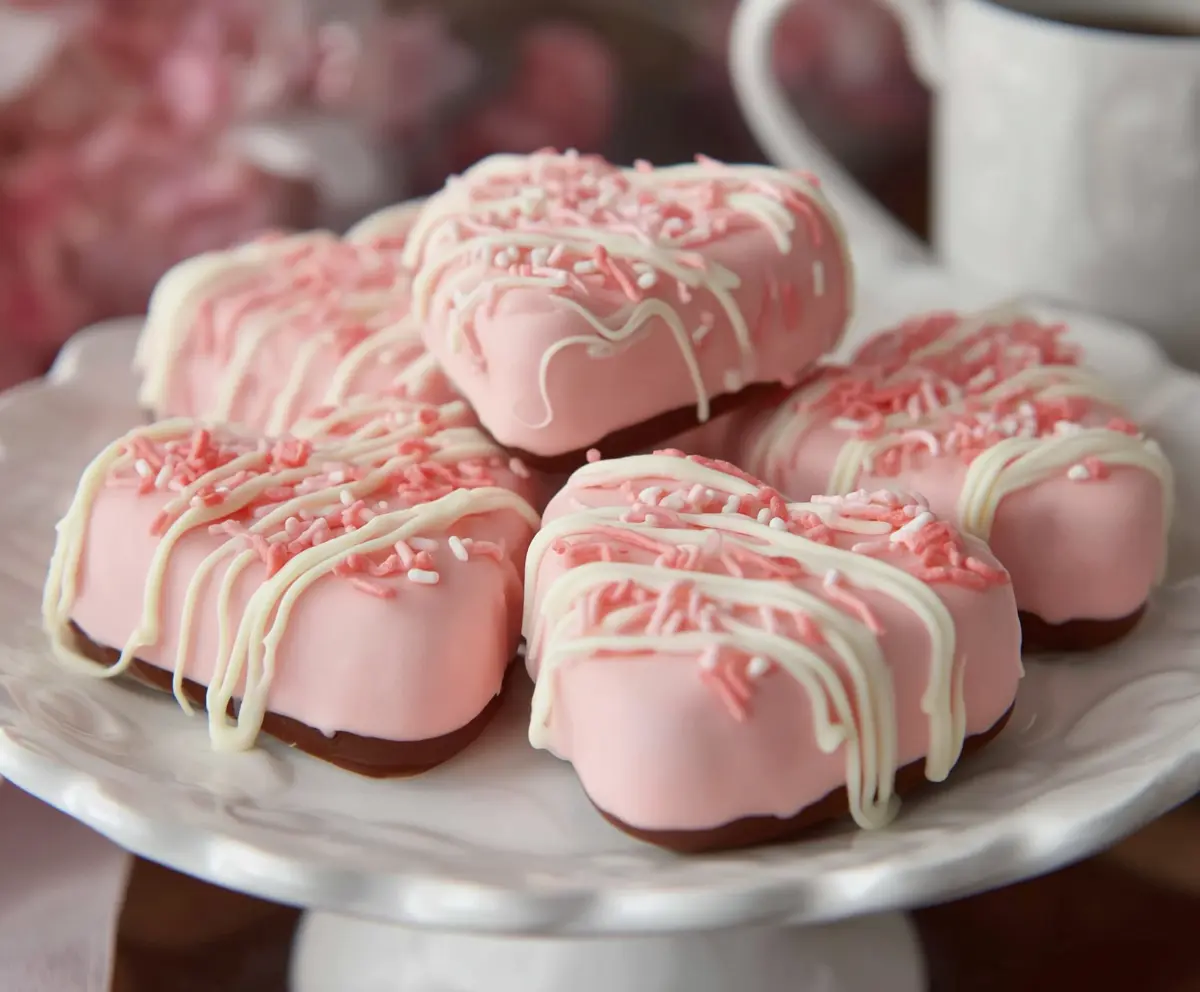
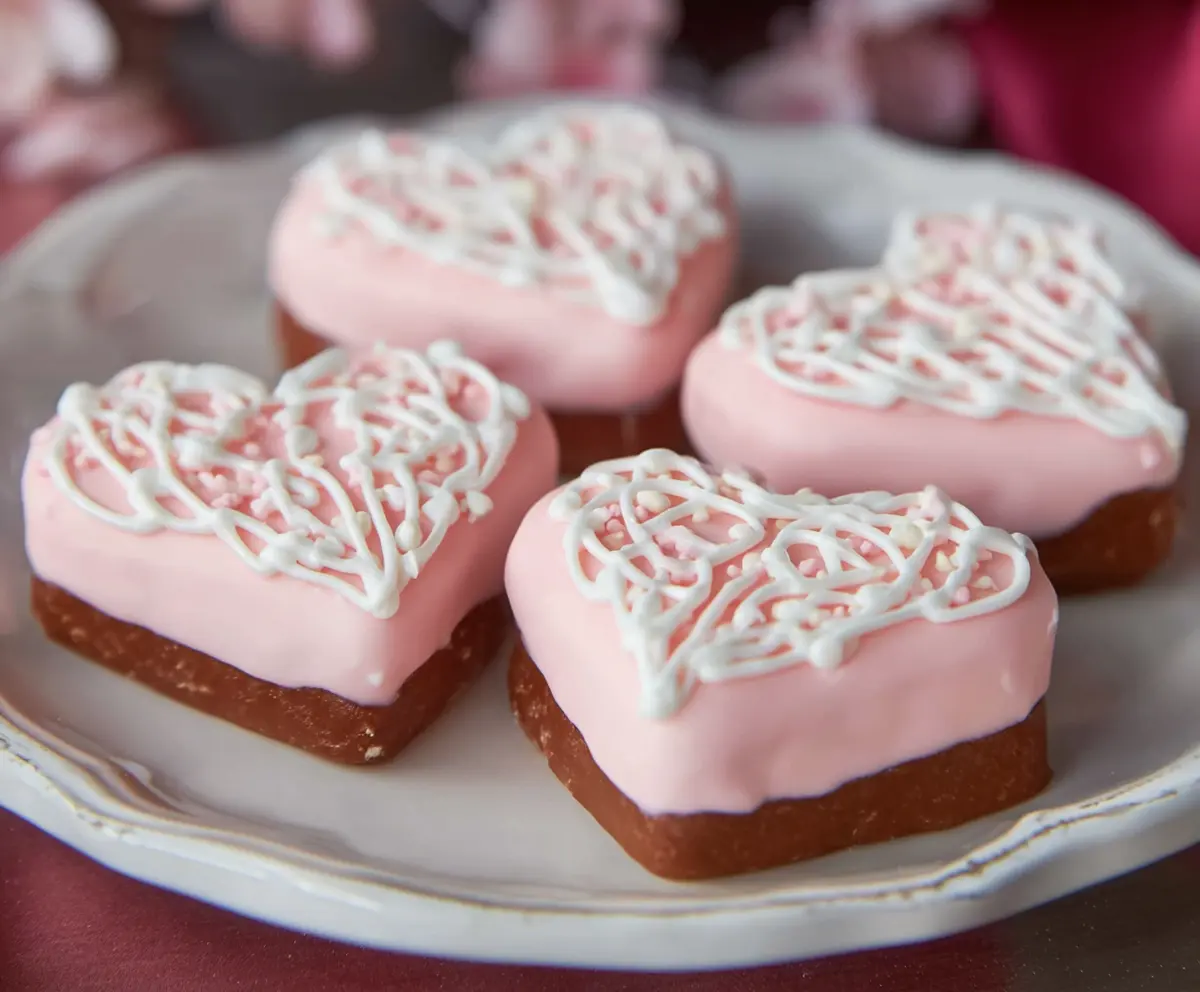
Copycat Little Debbie Valentines Cakes are soft, fluffy cakes filled with a sweet cream center and topped with a vibrant pink or red icing, decorated with cute hearts just like the ones you remember from your childhood. These little cakes are perfect for sharing some love and sweetness in a fun, nostalgic way.
I love making these Valentines Cakes because they bring back all the good feelings of special treats from when I was a kid. The best part is flipping the classic store-bought snacks into a homemade version that tastes even better, with that creamy filling and light cake that melts in your mouth. I like to add a sprinkle of extra hearts on top just to make them extra festive!
These cakes are perfect for a sweet snack, a party treat, or even as a thoughtful homemade gift for someone you care about. I often enjoy them with a glass of cold milk or a cup of tea, which makes the experience even cozier. It’s the little things, like these Valentine’s Cakes, that make the day brighter and sweeter.
Key Ingredients & Substitutions
Cake Ingredients: All-purpose flour and cocoa powder give the cake its soft, chocolate flavor. If you prefer gluten-free, a 1:1 gluten-free flour blend works well here.
Buttermilk: It makes the cake tender and fluffy. No buttermilk? Use regular milk with 1 tsp vinegar or lemon juice added for acidity.
Cream Filling: Butter and powdered sugar create a rich, creamy center. For a lighter option, try cream cheese instead of butter for a tangier filling.
Coating: White candy melts are great for the pink color and smooth finish. You can substitute with white chocolate plus pink gel food coloring if preferred.
Chocolate Bottom: The milk chocolate base adds contrast and stability. Dark chocolate works fine too if you like a slightly richer taste.
How Do You Shape and Coat the Cakes Without Making a Mess?
The key to neat hearts or rectangles is chilling and handling the cake mixture carefully.
- After mixing cake crumbs with filling, chill until firm. This helps the shapes hold better when forming.
- Use lightly greased hands or a small scoop to form shapes gently but firmly.
- Dip just the bottom in melted chocolate, letting excess drip off to avoid pooling.
- Cover with pink coating either by dipping quickly or spooning evenly, smoothing edges with a spatula if needed.
- Work quickly before coating sets to add drizzle and sprinkles for a pretty finish.
- Chill again until fully set before moving or storing for best results.
Equipment You’ll Need
- 8×8-inch baking pan – perfect size for baking the cake evenly and easy to handle.
- Mixing bowls – handy for combining dry and wet ingredients separately and for mixing filling.
- Electric mixer or hand mixer – makes beating the buttercream filling smooth and fluffy.
- Spatula – great for folding ingredients and smoothing batter in the pan.
- Parchment paper – helps prevent sticking when chilling and coating the shaped cakes.
- Dipping tools or forks – handy for coating the bottom and sides of cakes without mess.
- Cooling rack – allows the coated cakes to set properly without sticking.
Flavor Variations & Add-Ins
- Swap cocoa powder for strawberry powder in the cake for a fruity twist that pairs well with the pink coating.
- Mix in finely chopped nuts like almonds or pecans into the filling for added crunch and flavor.
- Add a drop of peppermint extract to the filling for a refreshing holiday-inspired taste.
- Top with mini chocolate chips or crushed freeze-dried raspberries instead of sprinkles for different textures.
Copycat Little Debbie Valentines Cakes
Ingredients You’ll Need:
For the Cake:
- 1 cup all-purpose flour
- 1/2 cup granulated sugar
- 1/4 cup unsweetened cocoa powder
- 1 tsp baking powder
- 1/4 tsp baking soda
- 1/4 tsp salt
- 1/2 cup buttermilk
- 1 large egg
- 1/4 cup unsalted butter, melted and cooled
- 1 tsp vanilla extract
For the Cream Filling:
- 1/2 cup unsalted butter, softened
- 1 1/2 cups powdered sugar
- 1 tbsp heavy cream or milk
- 1 tsp vanilla extract
For the Coating and Decoration:
- 12 oz white candy melts or white chocolate, tinted pink with food coloring
- 6 oz milk chocolate or semi-sweet chocolate, melted (for bottom coating)
- White chocolate, melted (for drizzle decoration)
- Pink and white heart-shaped or jimmies sprinkles
How Much Time Will You Need?
This recipe takes about 20-25 minutes to bake, plus 15 minutes for mixing ingredients, and at least another hour for chilling and decorating the cakes. Overall, expect about 1 hour and 30 minutes from start to ready-to-eat, including chilling time to set the fillings and coatings.
Step-by-Step Instructions:
1. Make the Cake:
Preheat your oven to 350°F (175°C). In a mixing bowl, whisk together the flour, sugar, cocoa powder, baking powder, baking soda, and salt. Add the buttermilk, egg, melted butter, and vanilla to the dry ingredients and mix until smooth. Pour the batter into a greased 8×8-inch baking pan, spreading it evenly. Bake for 20-25 minutes or until a toothpick inserted in the center comes out clean. Let the cake cool completely in the pan.
2. Prepare the Cream Filling:
In a bowl, beat the softened butter until creamy using a hand mixer. Gradually add in powdered sugar, heavy cream, and vanilla extract, beating until fluffy and smooth.
3. Assemble and Shape:
Crumble the cooled cake into fine crumbs in a large bowl. Add the cream filling and mix well until the mixture holds together like dough. Using your hands or a small cookie scoop, shape the mixture into hearts or small rectangles. Place them on parchment-lined trays and chill for at least 30 minutes to firm up.
4. Coat the Cakes:
Melt the milk chocolate and dip the bottom of each cake shape, letting excess drip off. Place them back on parchment paper and chill until set. Then melt the pink-colored white candy melts and fully dip or spoon the coating over each cake, smoothing the edges. Before the coating sets, drizzle melted white chocolate on top and sprinkle with pink and white decorations.
5. Final Chill and Serve:
Chill the decorated cakes until the coating is firm. Store in an airtight container in the refrigerator until ready to enjoy. Share and delight in your homemade Valentines Cakes!
Can I Use Frozen Cake to Make These Valentines Cakes?
Yes! Just be sure to thaw the cake completely before crumbling it to mix with the filling. Thaw overnight in the fridge for best results to maintain texture.
How Long Can I Store the Valentines Cakes?
Store them in an airtight container in the refrigerator for up to 4-5 days. Let them come to room temperature for about 10 minutes before serving for the best flavor and texture.
Can I Substitute the White Candy Melts?
Definitely! White chocolate works well, and you can tint it pink with a small amount of oil-based food coloring. Avoid water-based coloring as it may cause the chocolate to seize.
Can These Cakes Be Made Ahead?
Yes, you can prepare and shape the cakes up to 2 days ahead and keep them refrigerated. Coat and decorate just before serving for optimal freshness and appearance.