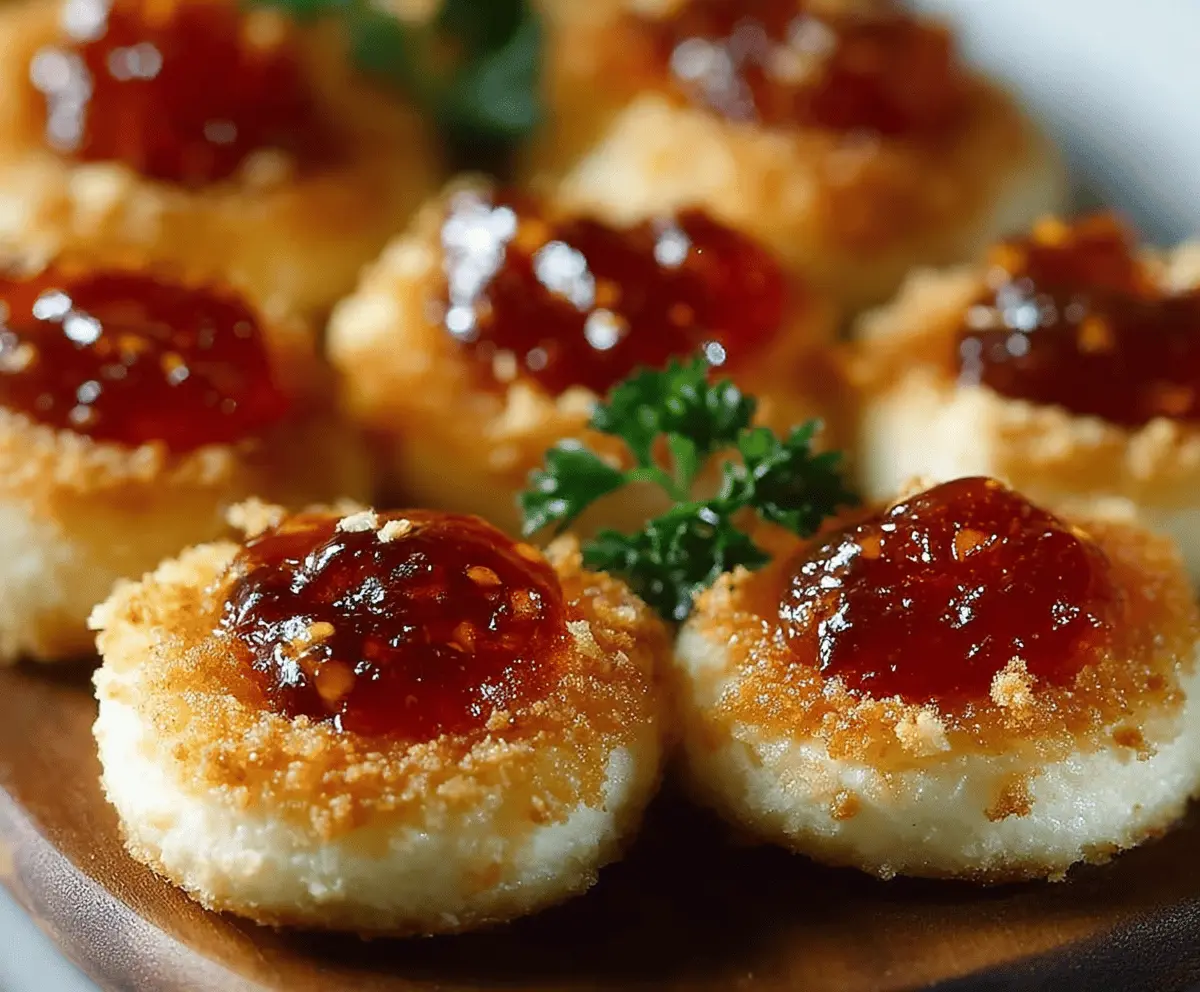
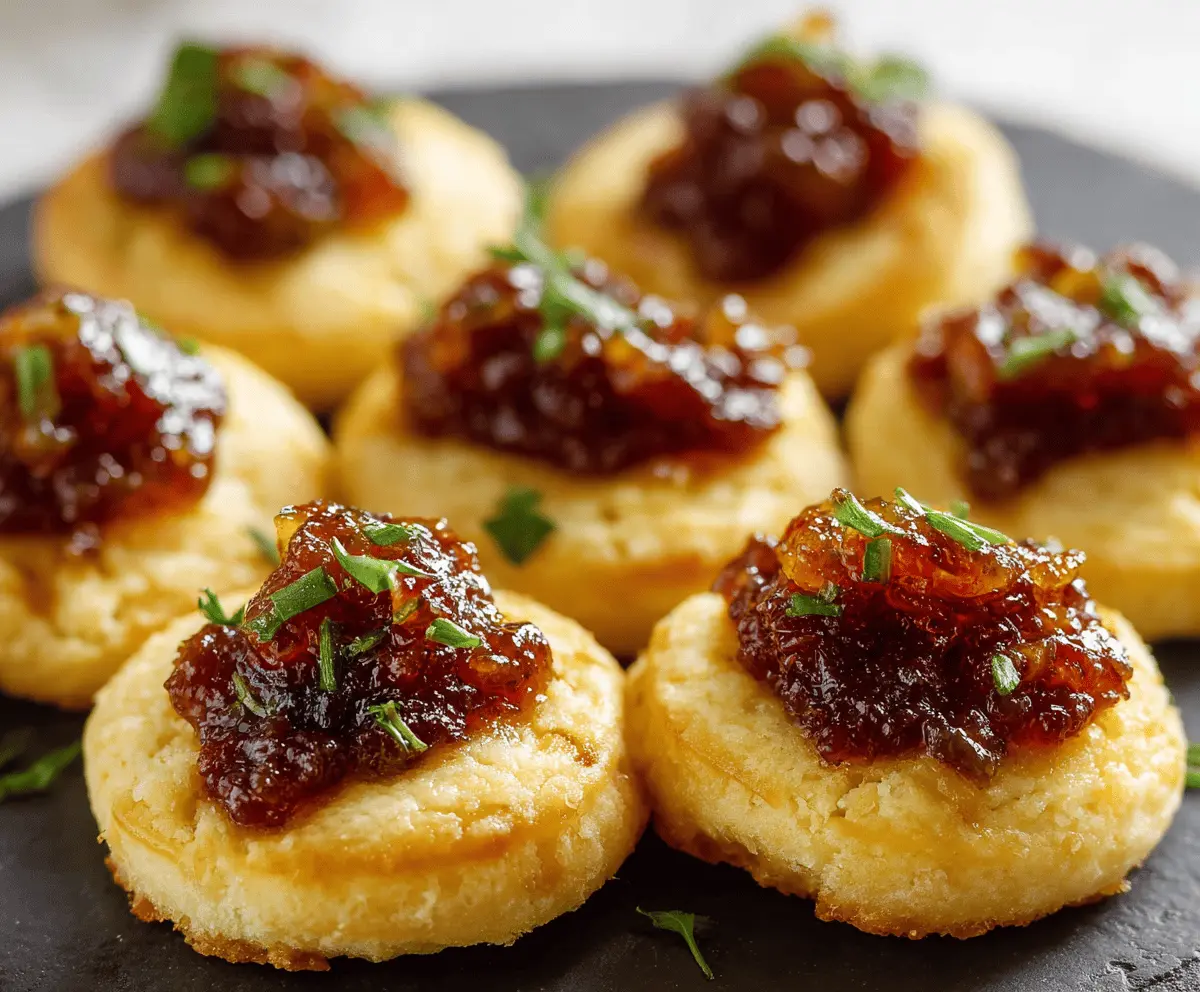
Cheesy Thumbprint Appetizers with Hot Pepper Jelly are a perfect little bite full of gooey cheese and a sweet-spicy kick. These tasty snacks combine a buttery, cheesy base with a dollop of vibrant hot pepper jelly right in the middle, creating a fun mix of flavors and textures that everyone seems to love.
I like making these appetizers when friends come over because they’re simple to whip up but look like you spent a lot of time in the kitchen. Plus, there’s something really satisfying about pressing the jelly into each thumbprint just so—it gives you a chance to get a little creative with how much jelly you add. I usually make a batch of these and they disappear fast!
These chewy, savory bites go really well with drinks at a party, but they’re also great on a snack tray alongside some fresh veggies or crackers. I always suggest serving them warm so the cheese is soft and melty, making each bite even more delicious. They bring a little sparkle to any gathering and are sure to become a favorite in your recipe box, just like they are in mine.
Key Ingredients & Substitutions
Cream Cheese: This gives the appetizers a smooth, creamy base. If you want a lighter option, try using Neufchâtel cheese, which has less fat but a similar texture.
Sharp Cheddar: It adds a nice tang and depth. If you’re not a fan, Monterey Jack or mozzarella are great milder alternatives.
Parmesan Cheese: Parmesan brings a salty, nutty flavor that balances the creaminess. Pecorino Romano can be swapped in for a sharper kick.
Panko Breadcrumbs: These create the crisp, crunchy coating. You can use regular breadcrumbs, but panko is best for extra crunch.
Hot Pepper Jelly: It’s the star topping with a sweet and spicy punch. If you prefer less heat, try a milder jelly, like apricot or cranberry jelly.
How Do I Make Crisp, Golden Cheese Bites That Hold Their Shape?
Getting the perfect crunchy outside and melty inside is all about coating and baking.
- Chill the cheese balls before coating to help them keep their shape.
- Coat evenly through the flour, egg, and panko steps—this triple coating seals in the cheese as it bakes.
- Spray or brush oil on top before baking to encourage a golden crust.
- Bake at 350°F for 15-20 minutes and watch for a golden, crisp outside without overbaking.
- When making the thumbprint indentation right after baking, be gentle since the cheese inside will be soft.
Equipment You’ll Need
- Baking sheet – provides a flat surface for even baking and crisping of the cheese bites.
- Parchment paper or silicone baking mat – keeps the cheese balls from sticking and makes clean-up easier.
- Mixing bowls – for combining cheese and for the flour, egg, and breadcrumb coating steps.
- Cookie scoop or spoon – helps form uniform cheese balls quickly and neatly.
- Measuring cups and spoons – to get the right amount of ingredients for the coating and filling.
- Cooking spray or pastry brush – to add oil and promote browning on the cheese balls.
Flavor Variations & Add-Ins
- Swap sharp cheddar for pepper jack cheese to add a subtle spicy twist to the base flavor.
- Mix in finely chopped cooked bacon or ham into the cheese mixture for a smoky, savory boost.
- Add fresh herbs like chives or parsley into the cheese mix for a fresh, bright note.
- Use different jellies like cranberry or apricot for a sweeter, fruitier contrast to the cheesy bites.
Cheesy Thumbprint Appetizers with Hot Pepper Jelly
Ingredients You’ll Need:
For the Cheese Balls:
- 8 oz cream cheese, softened
- 1 cup shredded sharp cheddar cheese
- ½ cup grated Parmesan cheese
For the Coating:
- 1 cup panko breadcrumbs
- ¼ cup all-purpose flour
- 2 large eggs, beaten
- Cooking spray or oil, for greasing and browning
For the Topping:
- 1 cup hot pepper jelly
- Optional: fresh parsley leaves for garnish
How Much Time Will You Need?
This recipe takes about 15 minutes to prepare and another 15-20 minutes to bake, so plan for around 35 minutes total. The prep includes mixing, shaping, and coating the cheesy balls, then baking them to golden perfection. You can add jelly and garnish just before serving.
Step-by-Step Instructions:
1. Prepare Oven and Baking Sheet:
Preheat your oven to 350°F (175°C). Lightly grease a baking sheet or line it with parchment paper to prevent sticking and for easy cleanup.
2. Make the Cheese Mixture and Shape Balls:
In a medium bowl, mix together the softened cream cheese, shredded cheddar, and grated Parmesan until smooth and evenly combined. Then, using your hands or a small cookie scoop, form the mixture into small balls about 1 inch in diameter.
3. Coat the Cheese Balls:
Set up three shallow bowls: one with flour, one with beaten eggs, and one with panko breadcrumbs. Roll each cheese ball first in the flour, then dip into the eggs, and finally coat with the breadcrumbs. Place the coated balls on the prepared baking sheet. Lightly spray or brush the tops with cooking oil to help them brown nicely.
4. Bake and Add Jelly:
Bake the balls for 15-20 minutes until they are golden and crispy on top and soft inside. Remove from the oven, and while still warm, gently press your thumb or the back of a spoon into the center of each ball to make an indentation. Fill each indentation with about a teaspoon of hot pepper jelly.
5. Garnish and Serve:
Optionally, add a small fresh parsley leaf on top for color and freshness. Serve the appetizers warm to enjoy the melty cheese and sweet-spicy jelly together. Perfect for parties or a tasty snack!
Can I Prepare These Appetizers in Advance?
Yes! You can shape and coat the cheese balls ahead of time, then refrigerate them for up to 24 hours before baking. Add the hot pepper jelly just before serving to keep the flavors fresh.
What Can I Use Instead of Hot Pepper Jelly?
If you prefer less heat, try substituting with apricot, mango, or cranberry jelly for a sweeter flavor that still pairs wonderfully with the cheesy bites.
How Should I Store Leftovers?
Store any leftover cheesy thumbprints in an airtight container in the fridge for up to 3 days. Reheat them in the oven at 350°F (175°C) for 5-7 minutes to restore crispiness before adding fresh jelly.
Can I Make These Gluten-Free?
Absolutely! Use gluten-free breadcrumbs instead of panko and make sure the flour you use is gluten-free as well. This way, you can enjoy these appetizers without worry.